Posts

Eggstraordinary Easter Giveaway!!!
Image
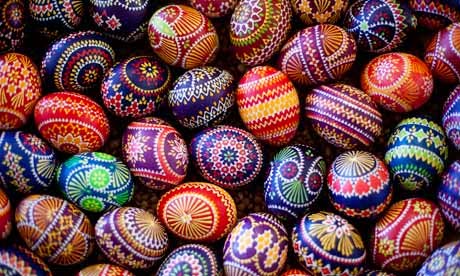
  This giveaway has been inspired by Heather at Fantasy Cross Stitch! Heather has generously gifted me with a chart I absolutely love (to be revealed very soon) for guessing the phrase she is currently stitching into a Love Thy Thread chart.   Click here for Heather’s Blog.   I feel very blessed and wish to pay the generosity she has shown me forward!   Easter is also a great time for fresh starts/new beginnings, so I am running a chart giveaway because I think you’re all good eggs! ;) Prize: One winner will be picked to receive a Heaven and Earth Designs chart of their choice* *The chart must be currently available on the HAED website and will be sent as a pdf via the RAK system. Please Read The Entry Rules: To enter leave a comment on this post sharing which chart you feel is so eggstraordinary you would drop all your current wips to start stitching it! You must be following my blog publicly .  Entries close on the following date ...

Sparkly Clouds & Violins

Image
I have finished page five of Nocturne! There is one more page of clouds to stitch to complete the first row.  Awhile back I decided to try Petite Treasure braid PB10 thread from Rainbow Gallery.  This page full of sparkly cloud stitching was a great opportunity to test out the PB10 and compare it with the Kreinik #4 032 (very fine braid) metallic.  I found they were not all that different to stitch with.  However, I did prefer the feel of the Treasure Braid because it frayed less when trying to thread it onto the needle and therefore I felt there was more integrity to the thread.  At a subtler level the Treasure Braid also seemed to sit slightly neater in the stitching because the integrity of the thread seemed sturdier. I also found the tones in each were slightly different and they both caught the light differently. The Krienik has an orange/gold tone running through it (which is absent in the Treasure Braid) and the Treasure Braid has a hot pink to...

Iris Keeper of the Rainbow, March Update

Image
I finally got through the second page of Iris! I recently discovered the loop start and have been using it on Iris.  The loop start can be used with 2 strands of thread and I'm stitching this one 2 over 1, on 20 ct mauve aida fabric.   I love the fact that I don't have to turn my work over as much and my back looks a little bit neater.  I was so excited about this technique that I went to show my Mum and Sister (they both stitch occasionally)and they were both like "Yes, we know about that!" It's a shame they didn't show me when I first started stitching years ago!  Anyway... it's worth a try if you like me have also "been out of the loop"and have not yet encountered it ;) Click here for the video on the loop start method Previous progress: Current progress update: Confetti close up: The small dent this has made in the overall piece! (Please excuse the wrinkles in the fabric):

Hunting for Treasure...

Image
Treasure Hunt is such a confetti heavy pattern that it seems to be taking a long time to get not much done!  I admire anyone braving the whole chart!  Page number three of the cropped section is now finished and I'm just over halfway through page four.  There are ten pages all up. Previous progress: The project was not fitting on my q-snap frame well (I had to hold it with the longer length as the height, which just felt weird) so I went a hunting for my old scroll frame, which has been tucked away in the cupboard catching dust for some time!   All of my other projects are too big for this frame but Treasure Hunt fits on there nicely.  Now I'm back to stitching with the frame being longer in width which feels less weird!  Having the two frames in use means I can work multiple projects and not have to swap projects on and off the q-snap as much :D  Yay! This was also timed well because now the stitching won't end up with indentation marks from th...

The Framing of Umbrella Sky Part 2

Image
I won't write "a novel" for part 2... I'll just cut straight to the reveal and bombard you all with photos! Here she is finally framed: This one I took with the camera flash turned on: Different angle: I choose a silver coloured frame because it was much more complementary than the darker frames I was initially looking at. I felt like I wanted some metallic element in there from the start. Blacks were just too dark and wood didn’t look right. I think the lighter color really brings her out and that’s where the attention should rightly go! Frame moulding up close:   I went with the conservation clear glass (cuts out UV) to hopefully prevent any potential fading from exposure to light. Unfortunately this shot ended up a bit blurry it gives an idea of the size anyway! I am quite tall for the record!: I think it turned out well after the long process to get to this point.  Now, back to stitching my wips!

Nocturne Update

Image
Hi! I hoped to have Umbrella Sky framed by now but unfortunately there has been a delay with the frame shop getting the moulding.  So I thought I'd show you all how Nocturne is going instead :) I've managed to finish page four which takes me to five pages completed!  This takes Nocturne from 9.97% to 12.43% complete.  It feels good to jump into the double digits! Previous progress: Current progress:  

The Framing of Umbrella Sky Part 1

Image
Washing Umbrella Sky: It took me about five months to get the courage to wash Umbrella Sky. Besides I wanted to enjoy looking at it for at least that long in case something went wrong (I was concerned about the reds running).  Thankfully it went well and no thread ran! She was washed in cold water with a tablespoon of Orvus Soap (also called Quilt Soap).  I washed and rinsed her twice because she was extra dirty and needed it!  After that I rolled the stitching between two towels to squeeze out the excess water. She was ironed (straight away) with a plain color tea towel over the top. Usually you iron the piece face down, but I found this was not as effective at getting wrinkles out. It worked much better ironing face up (with tea towel over top). Then she was left to dry on a flat surface. I stitched my name and years worked on into the border: Framing Dilemmas: Different framers had different ideas on the best way to frame a work like this.  This...